Decal
https://www.ronja-tutorials.com/post/054-unlit-dynamic-decals/
Preparing the Data we need 🔗︎
Since this will be a simple unlit shader apart from the projection, we can start with just a transparent shader. Though we dont need the UVs from the mesh itself, and we do need both the screen position to read from the depth buffer as well as a ray from the camera to the object to reconstruct the position(there are other ways, but this seemed easiest rn). I go deeper about screenspace coordinates and their implications in my tutorial about them, for the ray I subtract the worldspace position by the camera worldspace position. As I explain in the tutorial, to unstretch the screenspace texture we need to divide by the w component of the vector.
//the data thats passed from the vertex to the fragment shader and interpolated by the rasterizer
struct v2f{
	float4 position : SV_POSITION;
	float4 screenPos : TEXCOORD0;
	float3 ray : TEXCOORD1;
};
//the vertex shader function
v2f vert(appdata v){
	v2f o;
	//convert the vertex positions from object space to clip space so they can be rendered correctly
	float3 worldPos = mul(unity_ObjectToWorld, v.vertex);
	o.position = UnityWorldToClipPos(worldPos);
	//calculate the ray between the camera to the vertex
	o.ray = worldPos - _WorldSpaceCameraPos;
	//calculate the screen position
	o.screenPos = ComputeScreenPos (o.position);
	return o;
}
//the fragment shader function
fixed4 frag(v2f i) : SV_TARGET{
	//unstretch screenspace uv and get uvs from function
	float2 screenUv = i.screenPos.xy / i.screenPos.w;
	getProjectedObjectPos(screenUv, i.ray);
	//...
And with this we can get started using that data.
Doing the Do 🔗︎
Get Depth 🔗︎
I opted to put the code for the projection into its own function since it felt cleaner and is easier to copy between files/into a library include file. It takes the screen position as well as the ray we just created.
We start by sampling the depth texture, this is not the same as the depth buffer, its a separate texture thats generated if we signal to the camera that we want it to do that, many postprocessing effects already do that, but you might also have to do it yourself depending on your scene. I’m going to assume you have a depth texture, if not take a quick look into my tutorial about postprocessing using that texture. Once thats enabled just adding sampler2D_float _CameraDepthTexture; as a uniform variable to our pass is enough for it to have access to that texture. Then in the function we use the SAMPLE_DEPTH_TEXTURE macro to read from the texture and Linear01Depth (depth) * _ProjectionParams.z to first get rid of the bias it uses for better encoding and then make it so its space reaches from 0 to the far clip plane, instead of 0 to 1.
//get depth from depth texture
float depth = SAMPLE_DEPTH_TEXTURE(_CameraDepthTexture, screenPos);
depth = Linear01Depth (depth) * _ProjectionParams.z;
Naive World Reconstruction 🔗︎
With the depth taken care of we next reconstruct the world position by multiplying the normalized ray by the depth. Once we did that, getting the object space position is a matter of a simple matrix multiplication.
float3 getProjectedObjectPos(float2 screenPos, float3 worldRay){
	//get depth from depth texture
	float depth = SAMPLE_DEPTH_TEXTURE(_CameraDepthTexture, screenPos);
	depth = Linear01Depth (depth) * _ProjectionParams.z;
	//reconstruct world and object space positions
	float3 worldPos = _WorldSpaceCameraPos + normalize(worldRay) * depth;
	float3 objectPos =  mul (unity_WorldToObject, float4(worldPos,1)).xyz;
	return objectPos;
}
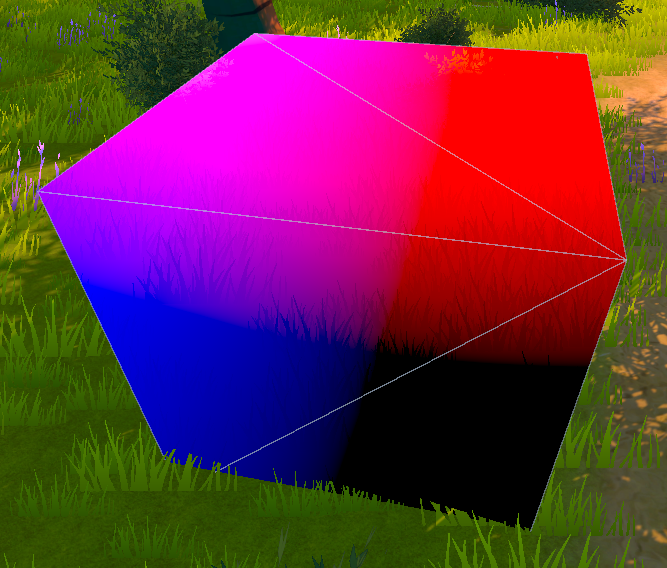
Clipping Stuff thats Behind 🔗︎
That does already look like positions based on the depth buffer and object position, but it doesnt just show the position where the cube is, but also behind where the cube is. Since we know the default unity cube we’re using here is 1x1 units big, we know the coordinates inside the cube go from -0.5 to 0.5, so lets discard all pixels outside of that. If we used a different model, different constraints might make more sense. The clip function discards all pixels in which it gets fed a value smaller than 0, if we give it vectors with multiple components, it discards pixels where any of the components is below 0. So to solve our current problem we can subtract the absolute(to catch negative values) of the object space position from 0.5 (which will be interpreted as a vector where each component is 0.5) and feed the result to the clip function.
clip(0.5 - abs(objectPos));
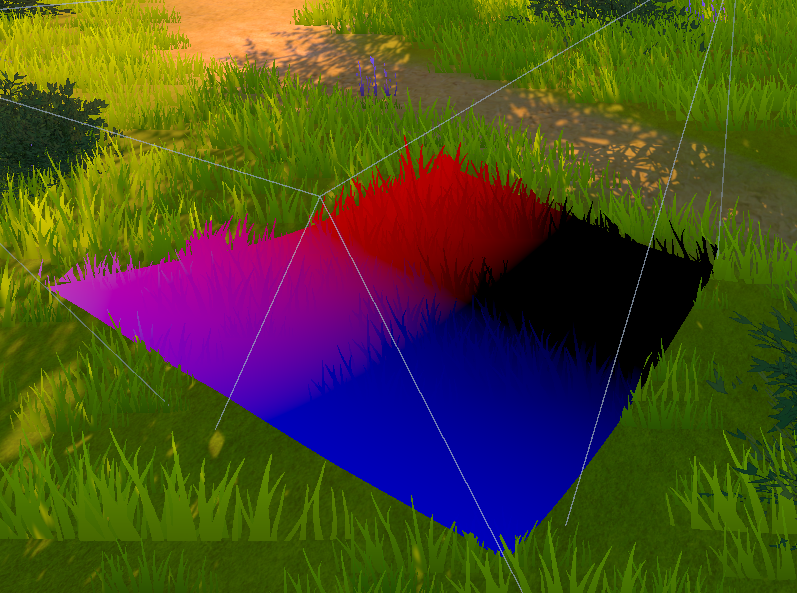
Fixing Worldspace Reconstruction 🔗︎
Now we get a square on the ground thats closer to what we imagined, but the square doesnt quite seem to behave, towards the corner of the screen it seems to slip upwards. This is because we made a small mistake in the worldspace reconstruction, we assumed that the depth texture has the distance from the camera, but it doesnt, the depth is kinda parallel to the camera in a way (this is because how modern realtime graphics work with their matrix multiplications, but thats a talk for another day).


댓글
댓글 쓰기